
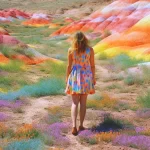
One Moment – Manipulation Tutorial
In this Photoshop tutorial I will show you how to create a nice spotlight effect on an image using the brush tool. It’s not a difficult effect to achieve but patience is needed. I used a single stock image which can be downloaded for free. Hope you like the result.
Step 1
Open the stock image of the woman in Photoshop and unlock the layer. I used the full scale of the image 4151X2823 but you can make it smaller if you want. Once you unlocked the background layer, rename it to woman and then create a new layer under it and name it darkness.

Step 2
This the most important step of this tutorial. You have to create the shadows on the woman’s body. If you have some practice creating shadows and light effects and if you have a basic understanding of how the light works, you will have it easier. Anyways I will try to illustrate the process the best I can.
Create a layer mask for the woman layer and grab the Brush Tool (B). Set the Foreground Color to black and opacity of the brush to about 50%. Use a soft brush and start painting around the edges of the image to reveal the darkness layer below.
Masking – first pass

Once you have something like in the image above, drop the opacity of the brush to about 20-25% and start painting over the left side of the face and, the hand and the shoulder. Don’t worry if you mask too much, you will fix it next.
Masking – second pass

Now switch the Foreground Color to white and set the Opacity of the brush to about 10% or even lower and start painting areas where you masked too much in order to bring the light back in. If you think that it looks good in general but you want a smoother transition between the dark an light areas, a good trick is to add Gaussian Blur to the Layer Mask.
This can be a fairly quick process if you’ve some experience. Since I did this for the first time it took me about 30 minutes to get the final result that you see below.
Masking – third pass (final)

Step 3
Because I used the full scale of the image, I could see all skin blemishes a lot better so I decided I would also make some skin cleaning using the Spot Healing Brush Tool (J) to remove small imperfections. I created a new layer and with he tool set to Sample All Layers I started painting over a few imperfections that I saw. The changes are minor.

Step 4
Another important step where you can further refine the shading and lighting is Dodging/Burning. As always, I work non-destructively by creating a new layer and filling it with 50% Gray and change the blend mode to Overlay (More about this technique on this tutorial).
Below you have the “dodge&burn map” with Normal blend mode so you can see exactly where I dodged and where I burned.

This is the before and after the dodge & burn process. Hover the mouse over the image and wait for it to load.

Step 5
The base is done, now you can add any effects you want. I used a Selective Color adjustment layer to change the overall color of the image. I only changed the Blacks and Neutrals, all the other colors are untouched. See image below for details.

Step 6
You can add a touch of fantasy to this by creating some light effects to those flowers on the crown of the woman’s head. I used 3 layers and the blend mode used are Color Dodge and Linear Dodge (Add). Use dark colors when using these blend modes. If the light effect that you get is too bright, use a darker color tone.
On the layer “Lights 3 Color Dodge” I used a bigger soft brush and here I also used a dark green color to paint over the eyes and make them look brighter.

Step 7
Next I modified the general lighting using the Lighting Effects Filter from Filter>Render>Lighting Effects. For that you first need to create a stamp of all the layers by selecting the top most layer on your palette and pressing Ctrl+Shift+Alt+E. Applying this filter, I made the face a bit brighter.

Step 8
Creating the sun rays is really easy. Just grab the Polygonal Lasso Tool (L) and draw a few shapes like in the image below and apply Motion Blur from Filter>Blur>Motion Blur. Apply this filter a few times. The distance option will depend on the size of your canvas, so I had to use distance 999px and apply the filter a few times. After that I applied Gaussian Blur to make the rays smoother. When your done, reduce the opacity of the layer to 20-25%.

Step 9
In order to make the dust particles I used the same technique use on the Lonely manipulation tutorial. Select a soft brush and open the Brushes window (F5). You need to create a dual brush to create some irregular shapes which will be your dust particles.
In order to create variation, activate Shape Dynamics and increase Size Jitter to about 90% and Scattering with Scatter at 1000% and Count to 1. Then activate Dual Brush and select the preset Spatter 14 as the secondary brush. Experiment with the settings of the Dual Brush until you get something you like. See image below.

When you have the particles like shown in the image above apply Gaussian Blur to make them look like they are out of focus. You can also apply some white Outer Glow if you want.

Step 10
Last but not least I made 2 more adjustments on top of all the layers. I used a the Curves adjustment layer to add more contrast and then I used a Color Balance adjustment layer to give that blue color touch. On Color Balance I only change the values on the Midtones.

And that’s all it is to it. Feel free to stumble it, share it on Facebook, Twitter or any social media you use.
Final Result

Previous

Buy CloudGhost with no Extra Fee

Categories
 3D Models & Addons (10,277)
 Adobe Indesign (121)
- Bundle (231)
- E-Books & Audio Books (4)
- Exclusive (106)
- Fashion (1)
- Final Cut Pro X (30)
- Footages (263)
- LUTs (278)
- macOS (549)
- Magazines (208)
- Most Downloaded Videohive (20)
- Photoshop (13,538)
- Actions *.ATN (2,109)
- Brushes *.ABR (1,141)
- Layered *.PSD (451)
- Lightroom Presets (5,701)
- Mock-Up (2,145)
- Shapes *.CSH (22)
- Styles *.ASL (294)
- Transparent *.PNG (1,159)
- Web Design Elements (144)
- Plug-ins (3,815)
- 3ds Max (509)
- After Effects (1,022)
- Cinema 4D (318)
- Illustrator (10)
- Maya (84)
- SketchUp (10)
- Unity (22)
- V-Ray (18)
- Premiere Pro (42)
- PREMIUM FILES (36)
- Presentation Templates (105)
- Prof. & Edu. Tutorials (716)
- SFX Sound (26)
- Software (1,576)
- Windows (1,550)
- 3D CAD (72)
- Development (1)
- Graphic Design (3)
- Multimedia (1)
- Utilities (2)
- Sounds (19)
- Special Fonts (86)
- Special Vectors (2)
- Stock Images (89)
- Abstracts & Textures (7)
- Animals (2)
- Arts & Illustration (1)
- Beauty & Selfcare (4)
- Buildings & Cities (1)
- Business & Finance (1)
- Fashion (4)
- Flowers & Plants (9)
- Food & Drink (20)
- Interiors (2)
- Nature & Landscapes (5)
- People (17)
- Science (1)
- Special Days & Events (3)
- Textures (13)
- Vectors (3)
- People (3)
- VFX (19)
- VideoHive (11,106)
- After Effects (9,546)
- Broadcast Packages (100)
- Elements (233)
- Infographics (50)
- Logo Stings (482)
- Openers (638)
- Product Promo (238)
- Titles (223)
- Video Displays (294)
- Apple Motion Templates (147)
- Christmas Templates (5)
- DaVinci Resolve (65)
- Motion Graphics (312)
- Premiere Pro (883)
- Project Files *.AE (94)
- Stock Footage (25)
- Videos Tutorials (15,565)
- 3D Tutorials (3,191)
- After Effects Tutorials (481)
- Animation (208)
- Crafts (9)
- Design (46)
- Development (221)
- Drawing/Painting tuts (2,298)
- Film & Media (1,171)
- Flash Tutorials (16)
- Marketing (26)
- Networks & Security (106)
- Photography (4,929)
- Photoshop (1,528)
- Premium Video (171)
- Programming (308)
- Web Design Tuts (364)


Checking...
Ouch! There was a server error.
Retry »
Retry »
Sending message...
FILE REQUEST
Fill your request here and our team will try to post this material on the site
